Ubuntu is the world’s most popular Linux distribution thanks to its extensive app store and robust hardware support. Whether you use it as your main operating system or you primarily use Windows, being able to remote desktop into Ubuntu from time-to-time is super useful.
Thankfully, Ubuntu has great built-in support for remote desktops, so you can easily use some of the best remote desktop software, specifically the best remote desktop for Linux, to remotely access your Linux computer.
Virtual network computing (VNC) is the predominant method used to remote desktop into Ubuntu, and you should be able to use any VNC-based remote desktop client to connect to it. It’s also possible to use Remote Desktop Protocol (RDP) or third-party commercial solutions.
How to remote desktop into Ubuntu: Preparation
To understand how to remote desktop into Ubuntu, it’s useful to know the remote desktop protocols it supports.
If you want to connect to other computers from your Ubuntu installation, the latest versions of Ubuntu include Remmina in their app store. It’s a great remote desktop solution. You can use it to connect to other computers from your Ubuntu installation through a variety of protocols, including VNC, RDP, SSH, and more.
Ubuntu has a built-in VNC-based remote desktop solution, so you don’t have to install any additional software. VNC is a ubiquitous cross-platform remote desktop sharing system that has clients for all popular operating systems and mobile devices.
To remote desktop to Ubuntu from Windows using VNC, you need a VNC client installed on the computer you want to connect from. Don’t worry—there are many free VNC clients, including TightVNC for Windows and RealVNC’s VNC Viewer for Android and iOS.
If you don’t want to use VNC, Ubuntu can support RDP if you install xRDP. In this guide, we’ll discuss both options. We’ll start with the VNC option, as it’s the most common method.
Step 1: Enable screen sharing
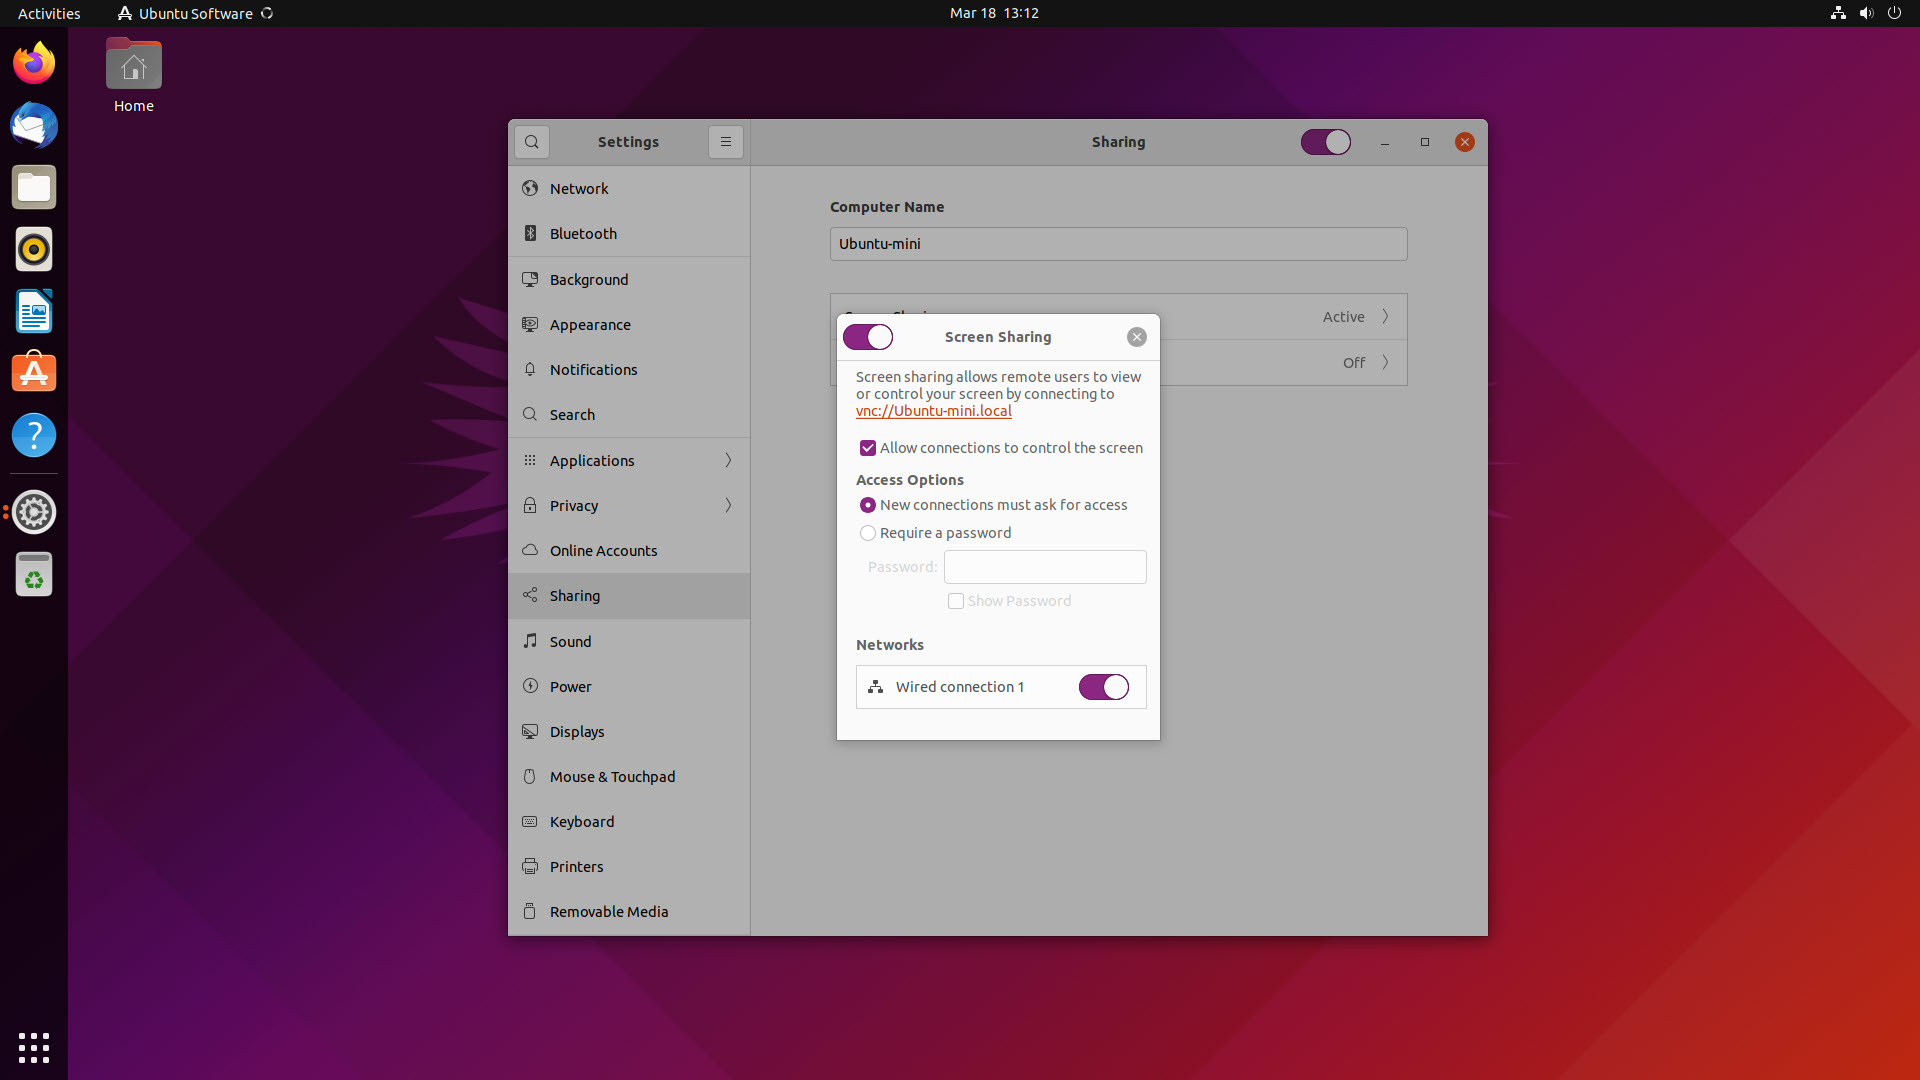
To get started, click on Ubuntu’s main menu button and search for Settings. In the Settings app, click on “Sharing”. Choose the menu option for “Screen Sharing”. Here, you can select a few settings on how your remote desktop will function.
Click “Allow connections to control the screen” if you want remote users to be able to send mouse and keyboard inputs. If you leave it disabled, they’ll be able to view the screen, but won’t be able to control it.
Choose whether the remote user needs to ask the current user for access, or if they can just enter a password to get control of the computer. Select the network(s) you want remote desktop to work over.
When ready, be sure to slide the slider at the top left of the “Screen Sharing” dialog box to on, before clicking the “Close menu” button.
Step 2: Set sharing to on
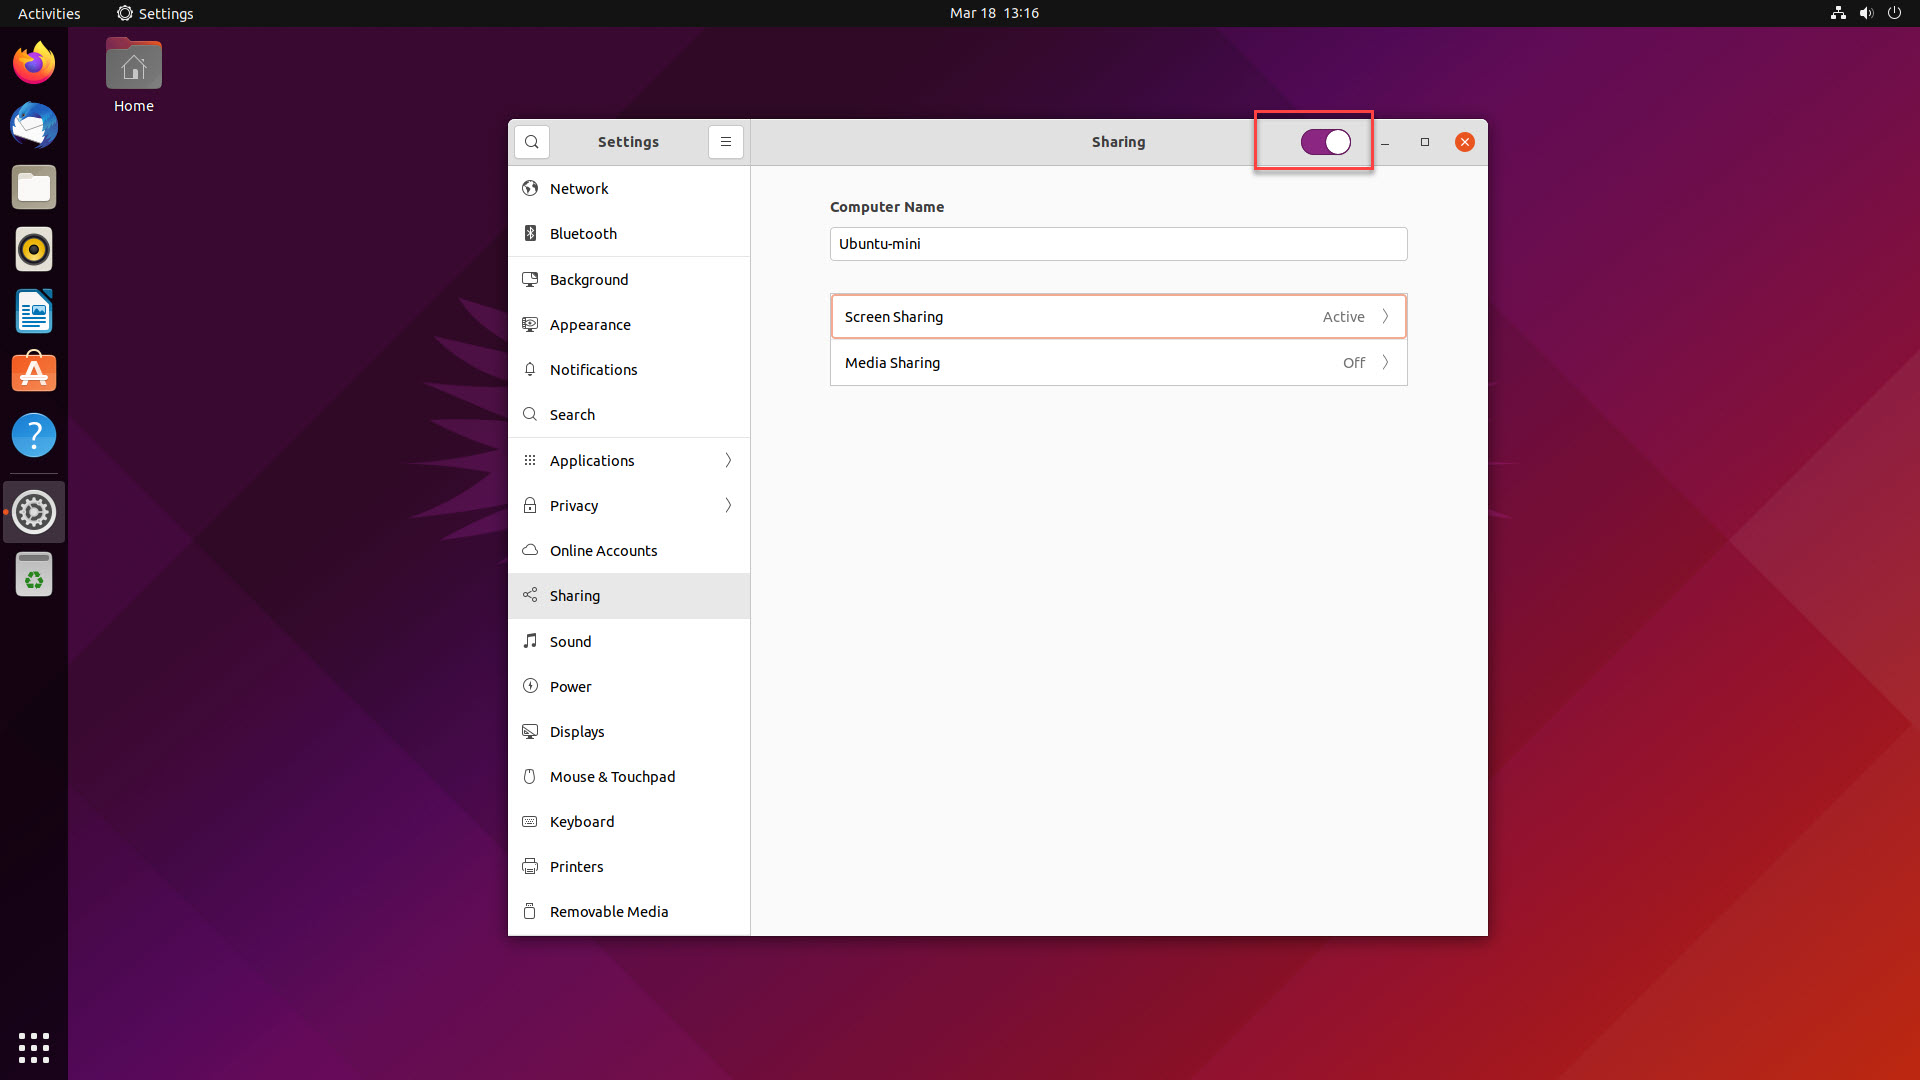
Something new users often miss is that there’s a second button for sharing that also needs to be enabled. Beyond setting “Screen Sharing” to active, you must also enable the general “Sharing” option. You’ll find it to the top right of the Sharing settings window.
With that done, your Ubuntu computer is ready and awaiting remote desktop connections.
Step 3: Get the IP address of your Ubuntu computer

Most VNC clients use the IP address of a computer to connect to it, so it’s very useful to know this number if you want to connect to your computer with VNC.
In Ubuntu, you can click on the network icon at the top right of the screen to gain quick access to your network settings. Select the network over which you want to connect to your Ubuntu machine. On the “Network Settings” page, click on the cogwheel to bring up your computer’s network details.
Note the number beside IPv4 Address. This is your Ubuntu computer’s IP address, and you’ll enter that into your VNC client.
Step 4: Install a VNC client

On the device you want to connect from, you need a VNC client. If you’re connecting from Windows, there are free, open-source clients such as the aforementioned TightVNC, TigerVNC, and UltraVNC.
Download and install your choice of VNC client app. The installation process will vary, but VNC clients are typically simple, lightweight programs that require very little extra setup. In our example, we’ll use TightVNC. Download the TightVNC software, run through the installer, and you’re ready to go.
Step 5: Remote desktop into Ubuntu
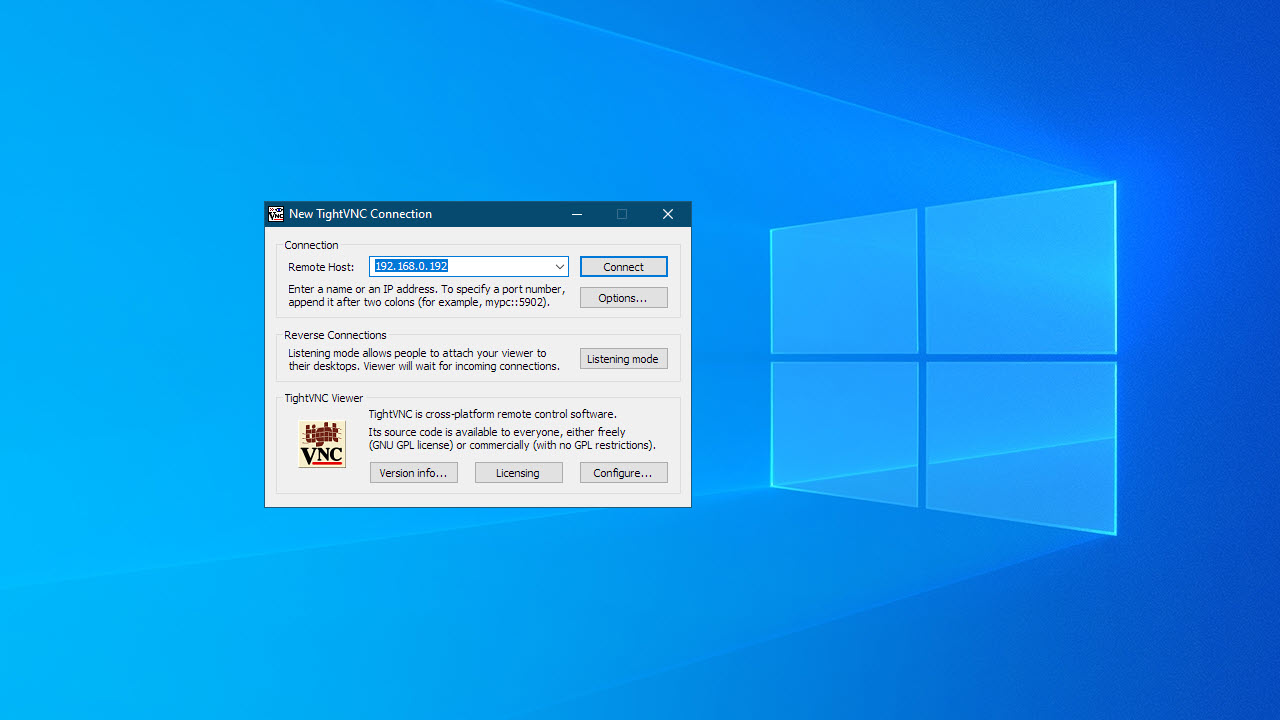
Open your VNC client app (sometimes called the viewer) and enter the IP address of your Ubuntu computer that you recorded earlier. Click “Connect”. If you set up a password for screen sharing in an earlier step, you’ll be asked for it now. Enter the password to remotely operate your Ubuntu computer.
Optional: Use RDP

If you predominantly work with Microsoft Windows, you may be more comfortable using RDP to connect to your Ubuntu computer than VNC. RDP is the protocol used by Microsoft Remote Desktop. It isn’t enabled by default on Ubuntu, but it’s easy to get it up and running by installing xRDP on your Ubuntu computer.
- To start, bring up the terminal (command line) on your Ubuntu computer by pressing Ctrl + Shift + T
- Enter the command ‘sudo apt install xrdp’, without the quotes, and press enter: you’ll need to enter your administrator password, and this command will download and install xRDP
- Now, enter the command ‘sudo systemctl enable xrdp’, without the quotes, and press enter: this will enable the xRDP listening service
Your Ubuntu computer is now able to accept RDP connections. You can use the software that’s built into all modern versions of Windows called Remote Desktop Connection, or download Remote Desktop clients for Android and iOS from their respective storefronts.
We’ve put together a guide on how to use Microsoft Remote Desktop Connection if you need guidance on using an RDP client.
How to remote desktop into Ubuntu: Summary
In this article, we looked at the most common ways to view and control your Ubuntu desktop from a remote location. But if you just need to access the command line remotely to run a few commands, we recommend skipping remote desktop solutions and using tried-and-tested SSH.
But for people less experienced with administration through the use of the command line, remote desktop is an appealing alternative. Ubuntu is one of the easiest Linux distributions for new users to pick up, and this user-friendliness extends to its remote desktop features. With just a few clicks, you can use the built-in remote desktop feature to begin remotely controlling your Linux computer through VNC.
Through a quick installation of xRDP, you can use RDP instead. This enables you to use Microsoft Remote Desktop Connection to remotely control your Ubuntu computer from Windows. Note that many of the performance advantages of using RDP on Windows don’t really apply when using it to connect to Ubuntu. You may find the latency and screen tearing to be higher than you’re used to when using RDP to connect to a Windows computer.
There are many other remote desktop solutions with support for Ubuntu. TeamViewer, for instance, is one of the more popular commercial desktop sharing applications available today. It can be used to remotely control any Ubuntu computer.
Chrome Remote Desktop is another option, but while it works well as a VNC client on Ubuntu, it’s a little complex to set it up to enable remote devices to connect to your Ubuntu machine.
Further reading on remote desktops
Discover our picks for the best free remote desktop software, if you're looking to save money. We've also outlined what TeamViewer is and the best TeamViewer alternatives for those on a budget; and reviewed a host of other leading platforms, including Zoho Assist, Splashtop Business, RemotePC, ConnectWise Control, and AnyDesk.
Original source: https://www.itproportal.com/guides/how-to-remote-desktop-into-ubuntu